How I Built a Budget Home Server for Storage & Media Streaming (And You Can Too!)
Why I Decided to Build a Home Server? It all started with a growing pile of external hard drives and a constant struggle to find the right movie or photo when I needed it. My family’s digital life was scattered across devices, cloud services and subscriptions that seemed to nickel-and-dime me every month. I was tired of paying for cloud storage I didn’t fully control and dealing with buffering issues. That’s when I realised I needed a better solution—a centralised hub for all our data and media. Enter the idea of a home server.
Not only would it give me complete control over my files, but it would also let me stream movies, music and TV shows seamlessly across all our devices. What is more important to my family is the central storage for our all digital life; photos, home videos and content. Plus, building it myself meant I could keep costs low and learn something new along the way. It was time to roll up my sleeves and dive into the world of DIY home servers.
Planning My Home Server: What I Needed
Before jumping into the build, I had to figure out exactly what I wanted this server to do. For me, the primary goals were simple: store all our family photos, documents, and media in one place, and stream that media to our TVs, tablets, and phones without hiccups.
I also wanted to keep the project budget-friendly—under $300 if possible. To achieve this, I had to make some key decisions. First, I debated whether to repurpose an old PC or buy used/refurbished hardware. I also had to choose between a pre-built NAS (Network Attached Storage) device or a custom-built server.
While NAS devices are convenient, I wanted more flexibility and control, so I opted for a DIY approach. Next, I researched software options. For the operating system, I considered Ubuntu Server, TrueNAS, and OpenMediaVault, ultimately settling on Ubuntu Server for its versatility and strong community support.
For media streaming, I compared Plex, Jellyfin, and Emby, leaning toward Jellyfin because it’s free, open-source, and packed with features. With a plan in place, I was ready to start building.
The Build: Step-by-Step
Step 1: Source the Hardware
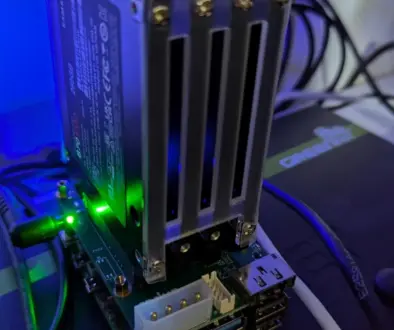
The first step was sourcing the hardware. I didn’t want to break the bank, so I looked for used or refurbished components. I found a refurbished Dell OptiPlex with an Intel i5 processor, 8GB of RAM, and a small SSD for the operating system. It was a steal at under $150. For storage, I added a couple of used 4TB HDDs I found online, keeping costs low while ensuring plenty of space for our files and media. I also made sure the system had Gigabit Ethernet for fast data transfer and smooth streaming.
Step 2: Installing the Operating System
Once the hardware was ready, it was time to install the operating system. I chose Ubuntu Server because it’s lightweight, free, and well-documented. The installation process was straightforward, though I had to get back into command line—something I hadn’t used for a while.
Step 3: Setting Up Storage
After setting up the OS, I configured the storage drives. I decided to use RAID 1 (mirroring) for redundancy, ensuring that if one drive failed, I wouldn’t lose any data. You will of course need two identical hard drives for this. I then created shared folders for documents, photos, and media, making them accessible to all devices on our network.
Step 4: Installing Media Streaming Software
Next came the fun part: setting up media streaming. I installed Jellyfin, an open-source media server, and pointed it to my media library. After a bit of tweaking, I had it up and running, complete with metadata, thumbnails and the ability to stream remotely. The whole process took a weekend, but by the end, I had a fully functional home server that met all my needs and I couldn’t wait to show it off to my family.

The Challenges I Faced (And How I Overcame Them)
MEMORY: Like any DIY project, building my home server came with its fair share of hurdles. The first challenge was dealing with limited RAM. My refurbished Dell OptiPlex came with only 8GB, which seemed sufficient at first, but once I started running Jellyfin and other services, I noticed some lag. After a bit of research, I realised that upgrading to 16GB would make a significant difference. I found a used RAM stick online for under $30, and the improvement was immediate—smooth streaming and faster file transfers.
REMOTE ACCESS: Another hurdle was setting up remote access so I could stream media outside the house. This required configuring port forwarding on my router, which sounded intimidating at first. I followed a few online tutorials and eventually got it working, but I quickly learned the importance of security. Opening ports to the Internet can expose your server to risks, so I set up a VPN to ensure secure access. It took some trial and error, but the peace of mind was worth it. This is of course, completely optional and is probably safer to keep your server out of the World Wide Web, leaving only local access.
Finally, there was the learning curve of using Linux. I worked with Ubuntu Server before, but getting back to command line is still a challenge. But with the help of forums, YouTube tutorials and even ChatGPT plus a lot of patience, I gradually got what I needed done. You will soon get the hang of it. I can navigate the terminal with confidence—proof that stepping out of your comfort zone can pay off.

The Results: Why It Was Worth It
After overcoming the challenges, I finally had a home server and it was worth every bit of effort. Our family photos, home videos and documents are now safely stored in one place, with automatic backups ensuring we never lose anything important. Movie nights have become seamless, with Jellyfin streaming our favourite shows and movies to any device in the house including the FireTV in the living room without buffering. Even better, I can access my media library remotely, whether I’m traveling or just away from home.
But beyond the practical benefits, this project gave me a sense of accomplishment. I built something functional and cost-effective, and I learned a ton in the process. It sparked a new interest in tech tinkering, and I’ve already started thinking about future upgrades, like adding more storage or setting up a home automation system. For anyone considering a similar project, I can’t recommend it enough—it’s empowering, rewarding, and incredibly useful.

Tips for Building Your Own Budget Home Server
If my journey has inspired you to build your own home server, here are a few tips to get you started:
Start with What You Have: Before buying anything, check if you have an old PC or laptop that can be repurposed. Even modest hardware can handle basic storage and streaming tasks.
Set a Budget and Stick to It: It’s easy to get carried away with upgrades, but focus on your actual needs. Used or refurbished components can save you a lot of money.
Choose the Right Software: Research your options and pick an operating system and media server that suit your skill level and goals. Ubuntu Server and Jellyfin are great starting points for beginners.
Prioritise Security: If you plan to access your server remotely, use a VPN and keep your software up to date to protect against vulnerabilities.
Join Online Communities: Forums like Reddit’s r/HomeServer and r/DataHoarder are goldmines of information and support. Don’t hesitate to ask questions—everyone starts somewhere.
Be Patient and Have Fun: Building a home server is a learning experience. You’ll make mistakes, but that’s part of the process. Enjoy the journey and celebrate your progress along the way.

My DIY Home Server Journey
Building a budget home server has been one of the most rewarding projects I’ve taken on. Not only did it solve my storage and media streaming woes, but it also opened up a whole new world of tech exploration for me. What started as a simple need to organise my digital life turned into a passion for tinkering, learning, and creating something truly useful.
If you’re on the fence about building your own home server, I encourage you to take the plunge. It doesn’t have to be expensive or complicated—start small, learn as you go, and build something that works for you. The sense of accomplishment you’ll feel when you stream your first movie or access your files remotely is unbeatable.
And hey, if I can do it, so can you. Whether you’re a tech newbie or a seasoned enthusiast, there’s something incredibly satisfying about creating a system that’s tailored to your needs. So, grab that old PC, fire up a Linux distro, and start building. Who knows? This might just be the beginning of your own tech journey.