DIY Motion Sensor Lights with Arduino or Raspberry Pi
Motion sensor lights offer convenience, security, and energy savings by automatically illuminating spaces when movement is detected. While commercial options exist, building your own system with Arduino or Raspberry Pi unlocks customization, cost savings, and valuable tech skills. Whether you want to brighten a hallway, secure a backyard, or automate room lighting, this guide walks you through creating custom motion-activated lights using simple hardware and code.
Arduino is ideal for plug-and-play simplicity, while Raspberry Pi adds advanced features like remote control and notifications. Both approaches deliver reliable results—pick your platform based on project complexity!
What You Need
Core Components
- Motion Sensor: A PIR sensor (HC-SR501) is affordable and widely used, while a microwave sensor (RCWL-0516) detects motion through walls.
- Microcontroller: Choose an Arduino Uno/Nano for basic setups or a Raspberry Pi (3/4/Zero) for Wi-Fi/cloud integration.
- Lights: Addressable LED strips (WS2812B) work well for color effects, or use a relay module to control standard bulbs.
- Power Supply: Match voltage to your lights (e.g., 5V for LEDs, 12V for high-power strips).
Optional Add-Ons
- Photoresistor (LDR): Disables lights in daylight.
- OLED Display: Shows motion logs or settings.
- Relay Module: Safely switches high-voltage bulbs.

Wiring & Hardware Setup
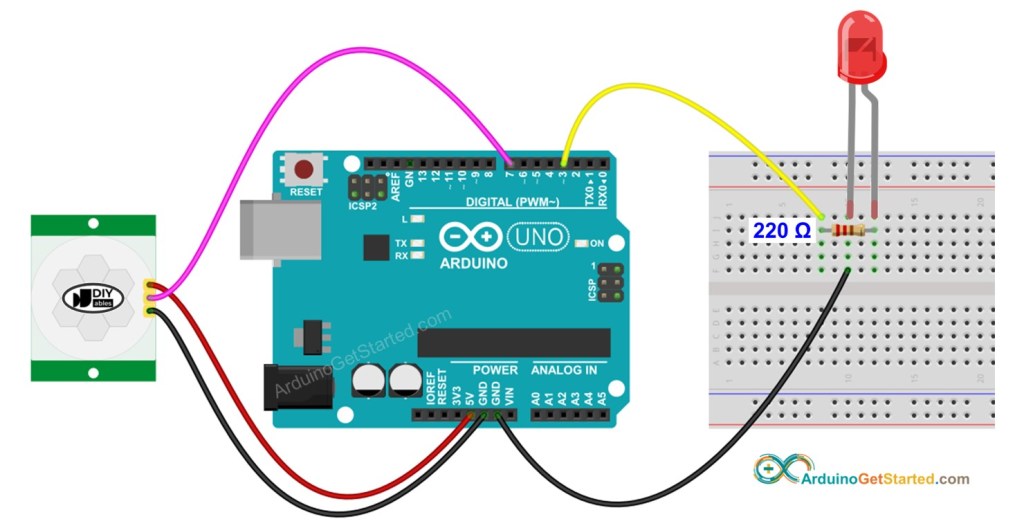
Option A: Arduino Setup
- Connect the PIR Sensor:
- VCC → 5V pin
- GND → GND pin
- OUT → Digital Pin 2
- Attach LEDs or Relay:
- For LED strips, link the data line to PWM pin ~6.
- For bulbs, wire a relay to pin ~6 and the light to the relay’s NO (Normally Open) terminal.
- Power Management:
- Use a capacitor (1000µF) across the LED strip’s power lines to prevent flickering.
Tip: Adjust the PIR’s sensitivity and delay knobs (HC-SR501) to fine-tune detection range and how long lights stay on.
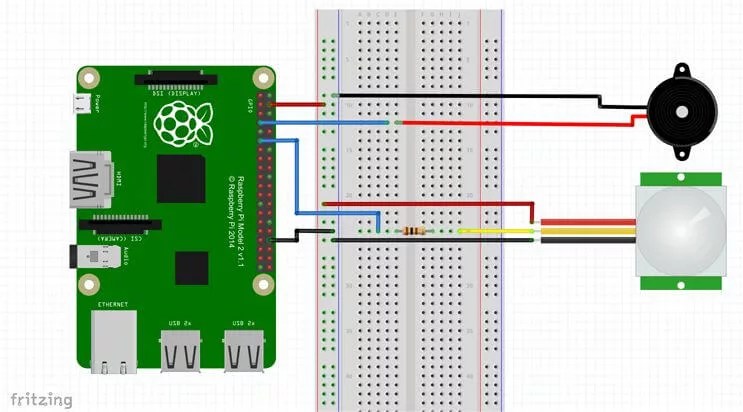
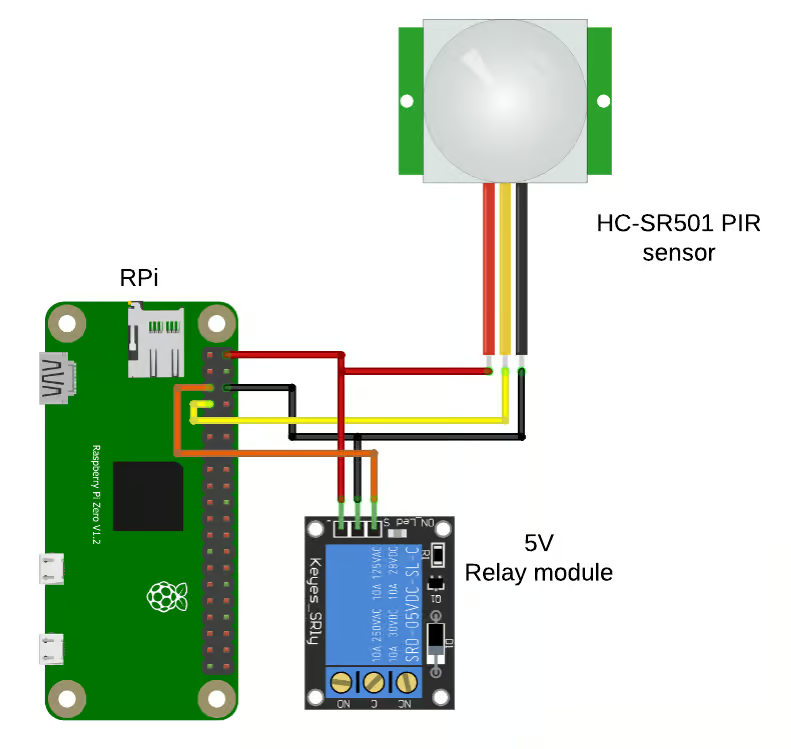
Option B: Raspberry Pi Setup
- Wire the PIR Sensor:
- VCC → 3.3V pin (Pi’s GPIO is 3.3V-tolerant)
- GND → GND pin
- OUT → GPIO4 (Pin 7)
- Control Lights:
- For LEDs, connect to GPIO17 via a resistor (330Ω).
- For AC bulbs, use a relay module (isolate Pi with optocouplers).
- Safety Note:
- Avoid drawing power directly from the Pi’s GPIO—use an external supply for LEDs/relays.
Python vs. Node-RED:
- Python scripts (GPIO Zero library) are great for quick testing.
- Node-RED offers drag-and-drop automation for complex rules (e.g., “Turn on lights only after sunset”).
Programming Your Motion Lights
Arduino Code (Basic PIR + LED Example)
#include <FastLED.h>
#define PIR_PIN 2
#define LED_PIN 6
#define NUM_LEDS 30

CRGB leds[NUM_LEDS];

void setup() {
pinMode(PIR_PIN, INPUT);
FastLED.addLeds<WS2812B, LED_PIN, GRB>(leds, NUM_LEDS);
}

void loop() {
if (digitalRead(PIR_PIN) {
fill_solid(leds, NUM_LEDS, CRGB::White); // Lights on
FastLED.show();
delay(5000); // Keep on for 5 seconds
} else {
fill_solid(leds, NUM_LEDS, CRGB::Black); // Lights off
FastLED.show();
}
}
Key Tweaks:
- Adjust
delay(5000)to change how long lights stay on. - Add
analogWrite()for dimming with non-addressable LEDs.
Raspberry Pi Python Script
from gpiozero import MotionSensor, LED
from time import sleep

pir = MotionSensor(4) # GPIO4
led = LED(17) # GPIO17

while True:
if pir.motion_detected:
led.on()
sleep(10) # Lights on for 10 seconds
else:
led.off()
Advanced Option: Use Node-RED for graphical programming (e.g., add MQTT or time-based rules).
Adding Daylight Detection (LDR)
Arduino:
int ldrPin = A0;
void loop() {
if (digitalRead(PIR_PIN) && analogRead(ldrPin) < 500) { // Dark = lights on
// Light activation code
}
}
Raspberry Pi:
from gpiozero import LightSensor

ldr = LightSensor(18) # GPIO18
if pir.motion_detected and ldr.value < 0.5: # 0.5 = darkness threshold
led.on()
4. Enclosure & Installation
Weatherproofing for Outdoor Use
- PIR Sensors: Seal with silicone conformal coating (avoid lens).
- Electronics: Use IP65-rated boxes with cable glands.
- LED Strips: Install in aluminum channels with diffusers.
Placement Tips
- Height: Mount PIR 6–8 feet high for optimal detection.
- Angle: Tilt sensor downward (15°) to reduce false triggers.
- Avoid: Heat sources (vents) or vibrating surfaces (fans).
Power-Saving Tricks
- Arduino: Use
sleepmode with watchdog timer. - Raspberry Pi: Schedule scripts to run only at night (
cronjobs).
Troubleshooting Common Issues
1. Motion Sensor Not Detecting
Fix:
- Check power (LED on HC-SR501 should glow).
- Adjust sensitivity pot (clockwise = more sensitive).
- Test in daylight (some PIRs ignore slow movement in bright light).
2. Lights Flicker or Stay On
Fix:
- Add a 1000µF capacitor across LED power lines.
- Set a shorter delay on PIR (HC-SR501’s yellow knob).
- For Raspberry Pi, use a relay with optocoupler to isolate GPIO.
3. False Triggers
Fix:
- Shield PIR from wind/curtains (use a “hood” from black tape).
- Switch to microwave sensor (RCWL-0516) if pets trigger PIR.
- Enable “retriggering off” mode on HC-SR501 (jumper setting).
4. Raspberry Pi Crashes
Fix:
- Power Pi via official adapter (not USB).
- Add heat sinks if using Pi Zero in enclosed spaces.
- Use
sudo apt update && sudo apt upgradeto fix software bugs.

Recap
You’ve now built a custom motion-activated lighting system that’s smarter than store-bought alternatives! Whether you chose Arduino for simplicity or Raspberry Pi for expandability, these core principles apply:
Start small (basic PIR + LEDs), then add features like daylight sensing.
Weatherproof outdoor installations thoroughly.
Optimize detection by tweaking sensor placement and code.
Remember to share your project