How to Optimise Your PC I: How to allocate SSD storage as RAM to boost the speed of your computer
Got to admit that most of us have seen our computers and laptops slouch. We have tried defragmenting disks, running clean-ups and stopping resource hoggin applications from Task Manager but to no avail. In this series, we look at how to optimise your PC with actual tips and tricks to apply to your PC to boot the speed of your computer.
The file manager still takes ages to load and the mouse pointer seems to have a never-ending spin beside it whenever we double click to install a heavy application or try to run one. While we may seldom find Mac users complaining about lazy computers, the phenomenon is quite common with Windows users. Add to this the constant searching and downloading of updates from Microsoft, it seems Windows was made to doze off easily.
Other Articles in the Series
- How to Optimise Your PC I: How to allocate SSD storage as RAM to boost the speed of your computer [YOU ARE HERE]
- How to Optimise Your PC II: How to stop services to free up resources on your computer
- How to Optimise Your PC III: Affordable hardware upgrades to speed up your PC
- How to Optimise Your PC IV: Best paid and free applications to clean your PC
Tips and Tricks to Boost the Speed of Your Computer
Here is an overview of our guide on how to optimise your PC. We intend to add and update this from time to time so do check back for more.
- How to allocate storage as RAM to boost the speed of your computer [You Are Here]
- How to stop services to free up resources on your computer… coming soon

While there may be a lot of reasons why your computer is underperforming, today we will focus on two reasons and their solutions. We will look at more reasons and their solutions in the next articles in this How to Optimise Your PC series.
- System Memory is Low and There are Limited/No Scope for Upgrade
- Unnecessary Services are Hogging Up Available Resources
Let us look at the low memory issue first.
When You are Low on Physical Memory
Computer slowing down could be a signal that you are running low on physical memory or RAM. These are present in the form of physical modules connected to your mainboard and are called in action for almost anything you do on your computer. RAM can be understood as a superfast but temporary storage facility in your computer that every application utilizes when it runs. RAM stores common data that every application and even Windows makes use of when running. When you run Google Chrome or even a game, the core files get stored in the RAM for the application to access as and when required.
When this temporary memory is low you are needed to add more RAM sticks and increase the total capacity of your system to accommodate more temporary data. However, at times RAM slots are limited requiring you to dispose off lower capacity modules for a higher capacity RAM stick, or in the case of laptops, they might be soldered which you cannot swap for a higher capacity. In these scenarios instead of going for a full upgrade which might leave a hole in your pocket, you can opt for using your permanent storage space as RAM.
How to Allocate Storage Space as RAM
Just like RAM modules have frequencies on which they operate, storage like HDDs or SSDs have read and write speed. HDDs have platter-like discs inside them that rotate with a read/write needle picking up the data. The speed of rotation is called RPM or Rotations Per Minute. Usually, a SATA or IDE Hard Disk with 7200 RPM has an average read and write speed up to a maximum of 200MBps. The advent of SSDs has made the allocation of storage space for RAM much easier and feasible. The performance is much better in Solid State Drives than HDDs as they do not have discs in them and operate like a flash memory storing data in semiconductors. Even low-quality SSDs have read and write speeds above 500MBps.
Here are the steps you ought to follow to allocate SSD space as RAM.
1. Step 1
Go to Computer > Properties from Start Menu
2. Step 2
Click on Advanced System Settings on the Left Top Corner
3. Step 3
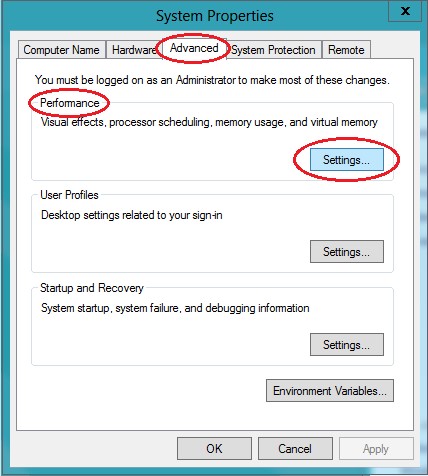
On the System Properties menu, click on the Advanced Option
4. Step 4
Look for the Settings option under Performance
5. Step 5
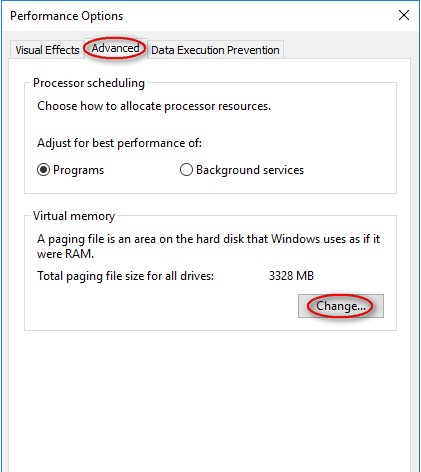
Click on the ‘Advanced’ tab on the Performance Options window. Look for a ‘Change’ button under Virtual Memory.
6. Step 6
Uncheck the box that says ‘Automatically manage paging file size for all drives
7. Step 7
Your storage drives should be listed under ‘Paging file size for each drive’. Considering you have installed your OS in the SSD, select the correct SSD.
8. Step 8
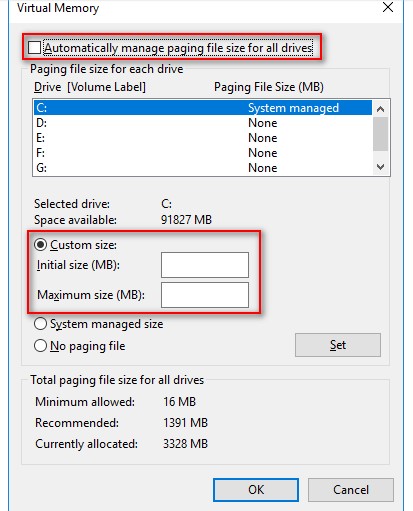
Click on the Custom Size radio button and then enter the minimum and maximum page file size you need in the appropriate blanks. The maximum blank is for the maximum amount of storage you want to use as RAM from your SSD.
Usually, this value you should enter here should be much more than what is currently allocated.
Click on the ‘Set’ radio button beside System Managed Size after entering the values.
9. Step 9
Click on Ok, a dialogue box should appear asking for you to restart your PC. Restart your PC for the changes to take effect.
Please note that this will not increase your physical memory size and it would still reflect the same as earlier but you would get a boost as more SSD space would be used as Page File or Virtual Memory.
Conclusion
Optimizing your PC is an amalgamation of several measures that you need to adopt to see a noticeable improvement in performance as the OS combines hardware and software features to drive a device. Different components of a PC or Laptop come with tailor-made optimizing solutions such as Disk Defragment for physical HDD drives and Trim for SSDs. Use these in conjunction with the steps above, to allow your system to use your SSD storage space for swap files and boost the overall performance of your system.